The next step was creating the hardware.
So, this is the backup of the epathy board site I made a while back. It is a bit glitchy because it is ported, and a fair amount of content is missing. I hope to get it fully recovered eventually.
https://fenstar.co/us/Relase/vq/medone2/specifications.html
I debated weather(sp) I should look up decora gang plate dimensions, or measure one of my inserts. In the end I decided to go with drawings, and drew up a rough 3D sketch.
I decided to experiment with different profiles for the stairs before I moved onto the final install.
Unfortunately it looks like the stair nose I ordered is never coming in.
Solution? Make my own!
Note: Please understand how to work with things correctly. PVC contains Chlorine which is dangerous, if you don’t know this, look up proper safety stuff.
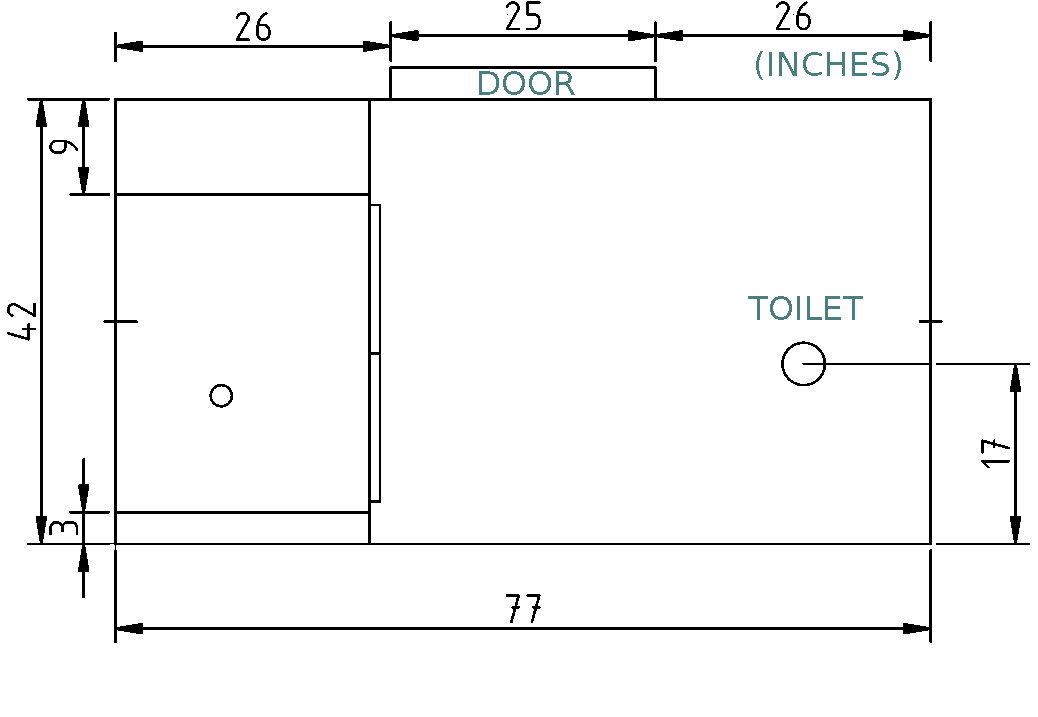
When replacing the entry half bath I noticed that the toilet wasn’t centered. Supposedly this is to make the room look bigger. I don’t know about that, but things not being centered or aligned bothers me, so I wasn’t sure what to do. I decided in the end that the vanity doors should be aligned with the toilet and a cubby would be put to one side for TP and such.
DC18RC battery charger
The DC18RC battery charger that was included is a bit odd.
The first thing you are likely to notice is that it advertises a different charge time for the different battery capacities. As none of the charge rates appear to exceed the 18 V / 9 A output shown on the bottom, I am not really sure why. There are a number of possibilities, but none really make sense in this context. Presumably is has something to do with heat dissipation, as it always does, but the tools should draw more current, and they don’t have fans.
After charging my battery, the battery seemed to be at room temperature but I found the charger case to be quite hot. I don’t have a thermometer on me but I can say it was significantly hotter than any charger I have ever used, and use mostly Chinese knockoffs to charge my LiPos. As a result, I decided to open the case.
Now that I have shown you two different hardware setups for the RGB strips, it is time to talk about the chip firmware and software.
I have chosen to use NodeMCU which uses Lua as the programming language. The good news is that all the functions you need are already there. As a result, even someone like me who doesn’t know Lua can easily write it.
And, thanks to a number of online blogs detailing what is going on, it is mostly copypasting existing code. Mostly this is adapted from the blog of openhardware.co.za. There were a few things unclear, but I suggest looking at it as he has much more verbose documentation.
You can easily find a 5 m RGB LED strip and controller for under $15 on amazon. The controllers have an IR remote and receiver that lets you select (and in more recent versions, program) a number of different lighting options. They are fairly cool, but IR remotes require line of sight and just aren’t as cool as using your phone/tablet/computer.